


Originally Posted on realpythonproject.com
Connect with me on LinkedIn, Twitter
Not all APIs are as well documented as Twilio. This guide should help you work with APIs which are secured using Keys, BasicAuth, or OAuth.
We will be working with the following APIS
If you are interested in a similar guide for Python, check out my previous article.
Table of Contents
- Insecure APIs
- Reading values from.env files
- APIs with Keys
- APIs with Basic Auth
- API Wrappers
- APIs secured via OAuth2
- Using the GitHub API (OAuth2)
- Using the Genius API (OAuth2)
Some familiarity with promises and async/await is expected. I will be running the code in a NodeJS environment.
You can find the source code here
Insecure APIs
The Dog Facts APIs does not require any authentication and is publicly available. It is fairly straightforward to work with it.
We will be making a request to the following endpoint
https://dog-facts-api.herokuapp.com/api/v1/resources/dogs/allFirst, we will need to install the node-fetch library
npm install node-fetchNow, let's make a GET request to the above endpoint in javascript
const fetch = require("node-fetch");
const apiURL = "https://dog-facts-api.herokuapp.com/api/v1/resources/dogs/all";
console.log(Making Request to ${apiURL});
fetch(apiURL)
  .then((result) => result.json())
  .then((res) => {
    res.map((element, idx) => console.log(${idx}. ${element.fact}));
  })
  .catch((err) => console.log(err));
We import the node-fetch library and make a request to the endpoint. We add a .then to resolve the Promise and a .catch to handle errors.
Reading from .env files
Before moving on to the next sections, let's look at how to read variables from a .env file. It's highly recommended to store your credentials in a .env file to avoid them being exposed to others.
We will need to install the 'dotenv' library
npm install dotenvAssume we have a .env file with some random API Token
API_TOKEN = "SOME API TOKEN"Let's try reading the API Token in JavaScript.
require('dotenv').config()
const API_KEY=  process.env.API_KEY
APIs with Keys
This is the most common form of authentication when consuming APIs. The API Key/Token is passed in as a header while making the request. We will be working with the Cat as a Service (CAAS) API. You can get a key here
const fetch = require("node-fetch");
require("dotenv").config();
const CAT_API_KEY = process.env.API_KEY;
const headers = {
  "x-api-key": CAT_API_KEY,
};
const api_url = "https://api.thecatapi.com/v1/breeds";
fetch(api_url, {
  headers: headers,
})
  .then((result) => result.json())
  .then((res) => {
    res.map((element, idx) =>
      console.log(${idx}. ${element.name} : ${element.description})
    );
  })
  .catch((err) => console.log(err));
We created an object called headers to store the API Key. The key in the object is "x-api-key". However, this can differ based on the API you are working with. Some APIs require the key to be named "Authorization", "authorization", "token" ,etc. It is best to refer to your API's documentation's authentication section.
Bearer Authentication is pretty common and it requires the word "Bearer " (note the space) to be at the beginning of the API Token/Key.
headers = {
    "authorization": f"Bearer {access_token}"
}
We will be using bearer authentication in an example in a later section.
APIs with Basic Auth
An API secured using Basic Auth requires a username and password. Usually, the username is the Client ID and the password is the Client Secret of the API. In some cases, the username can be left blank. This should be mentioned in the API documentation.
The Twilio API is secured using Basic Auth. You can sign up on the Twilio website and get access to the API credentials.
We will be using the base-64 library, you can install it using npm
npm install base-64The only difference is in the headers object will be passing while making the GET request. We will use a header object like below
headers = {
    'Authorization' : 'Basic ' + base64.encode(twilio_id + ":" + twilio_token)
}
Note there is a space after Basic
In the case of twilio, the username is your account sid and the password is your account token. As mentioned before, it can be different for different APIs. If the API you are using, uses Basic Auth to secure its endpoints, refer to the docs for the username and password.
Now let's make a request to the twilio API
const fetch = require("node-fetch");
const base64 = require("base-64");
require("dotenv").config();
const twilio_id = process.env.TWILIO_ACCOUNT_SID;
const twilio_token = process.env.TWILIO_ACCOUNT_TOKEN;
headers = {
  Authorization: "Basic " + base64.encode(twilio_id + ":" + twilio_token),
};
const api_url = https://api.twilio.com/2010-04-01/Accounts/${twilio_id}/Calls.json?PageSize=5;
fetch(api_url, {
  headers: headers,
})
  .then((res) => res.json())
  .then((res) => console.log(res))
  .catch((err) => console.log(err));
As you can see, the code is pretty similar to the code we wrote when making a requests to the Cat API. The only difference being in the headers object.
API Wrappers
API wrappers are essentially packages that can be installed using npm. They make interacting with APIs easier and make your code look cleaner. Under the hood, the package will use fetch and headers to authenticate your requests. However, the wrapper makes the code look cleaner.
Twilio has a wrapper which can be installed using npm
npm install twilioLet's use the twilio wrapper to interact with the twilio API
const twilio = require('twilio')
require('dotenv').config()
const twilio_id = process.env.TWILIO_ACCOUNT_SID
const twilio_token = process.env.TWILIO_ACCOUNT_TOKEN
const client = new twilio(twilio_id,twilio_token)
client.calls.each(call => console.log(call),pageSize = 5);
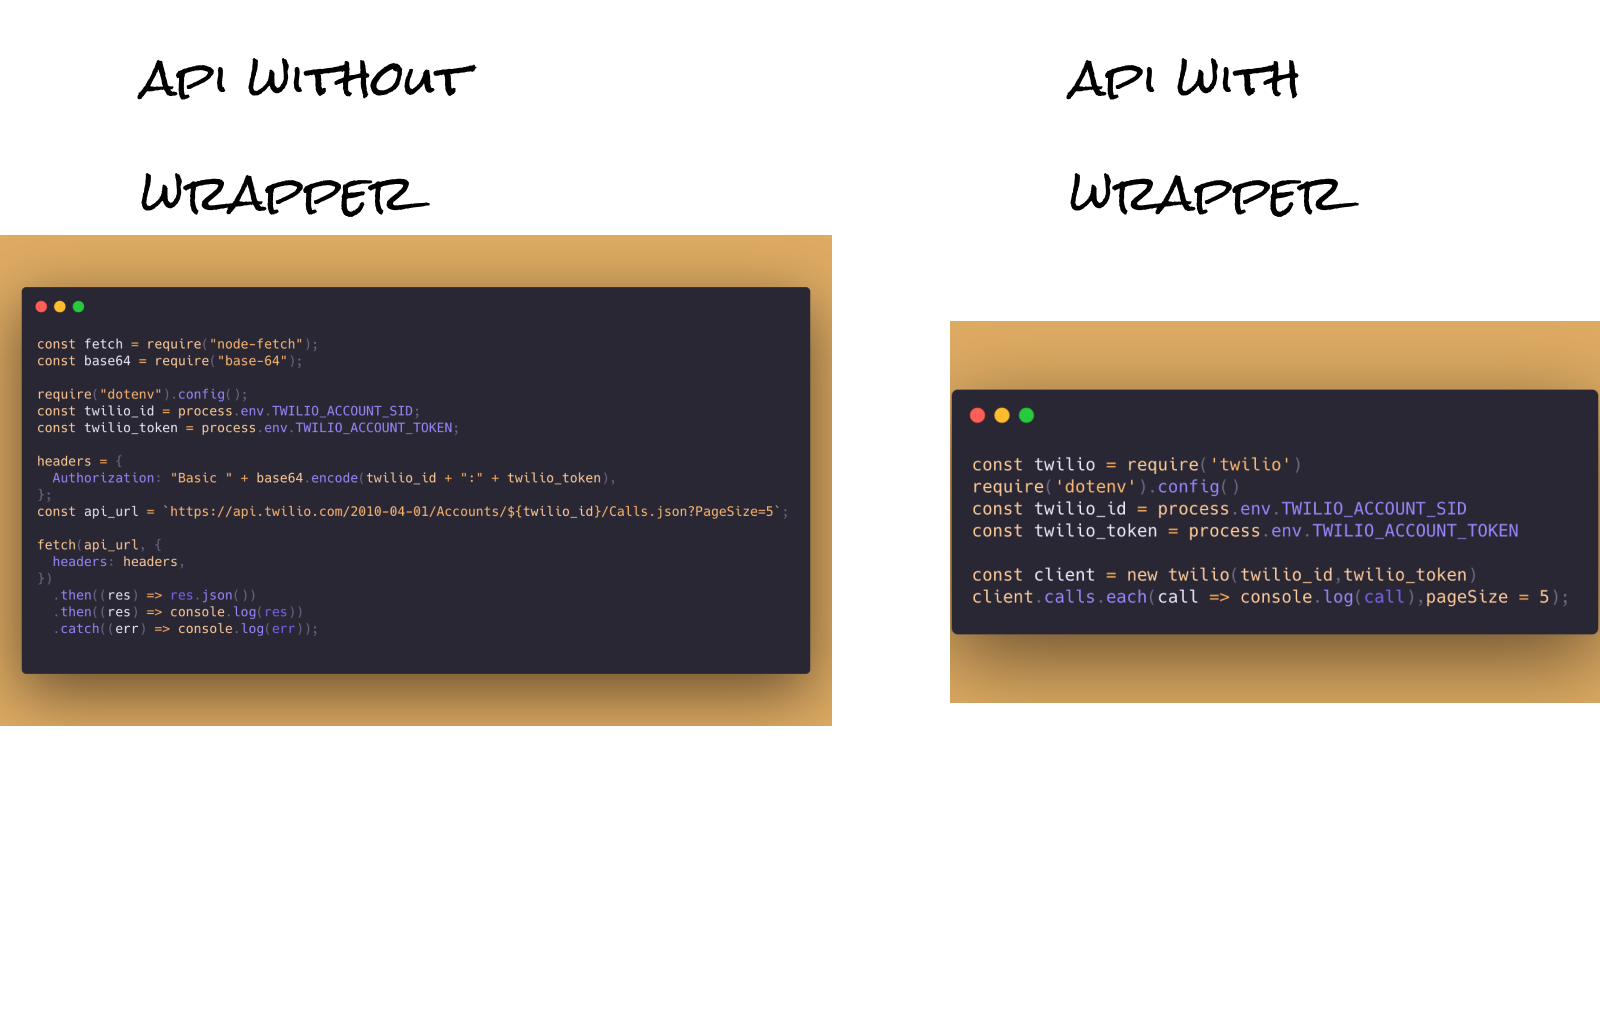
For handling errors, we could put the code inside the try..catch block.
Unfortunately, not all APIs have a wrapper. However, a lot of them do. Before a consuming an API directly, try searching for a wrapper for it. This will make it significantly easier to work with the API.
APIs secured via OAuth2
Using OAuth2 web flow to authenticate is usually used in Express apps when you need a "Sign Up using Google", "Sign Up using Facebook" option. However, some APIs need OAuth2 for all their endpoints. The GitHub API supports OAuth2 authentication as well as Key based authentication. In this article we will be using the OAuth web flow to work with the GitHub API and the Genius API.
I won't be going too much into detail on how OAuth2 works since that is beyond the scope of this article. Below is a high-level overview. If it doesn't make sense, skip over to the Github or Genius API section and it should make more sense.
- We will have to create a client app on the API's website
- The client app will have a client ID and Client Secret
- We will have to make a request to the API's authentication endpoint. The client ID and client Secret will be passed as query parameters.
- The authentication endpoint will ask for permission and will have to be authorized
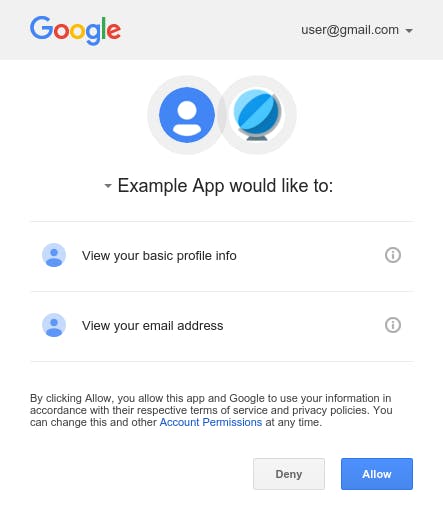
- Once authorized, it will return a code
- This code will have to be given to another endpoint which will exchange it for an access token.
- This access token can now be used as a key and be passed as a header object when making requests to the endpoint.
Let's take a look at a couple of examples.
Using the GitHub API (OAuth2)
As mentioned above, OAuth2 is mostly used with Express APPs. When working with OAuth2, you will need a web app URL and a URL to redirect the user to once they authorize/give permission. Since we do not have a web app, we do not have any URL. However we can use HTTPBin. Whenever we need an URL, we can use the following URL
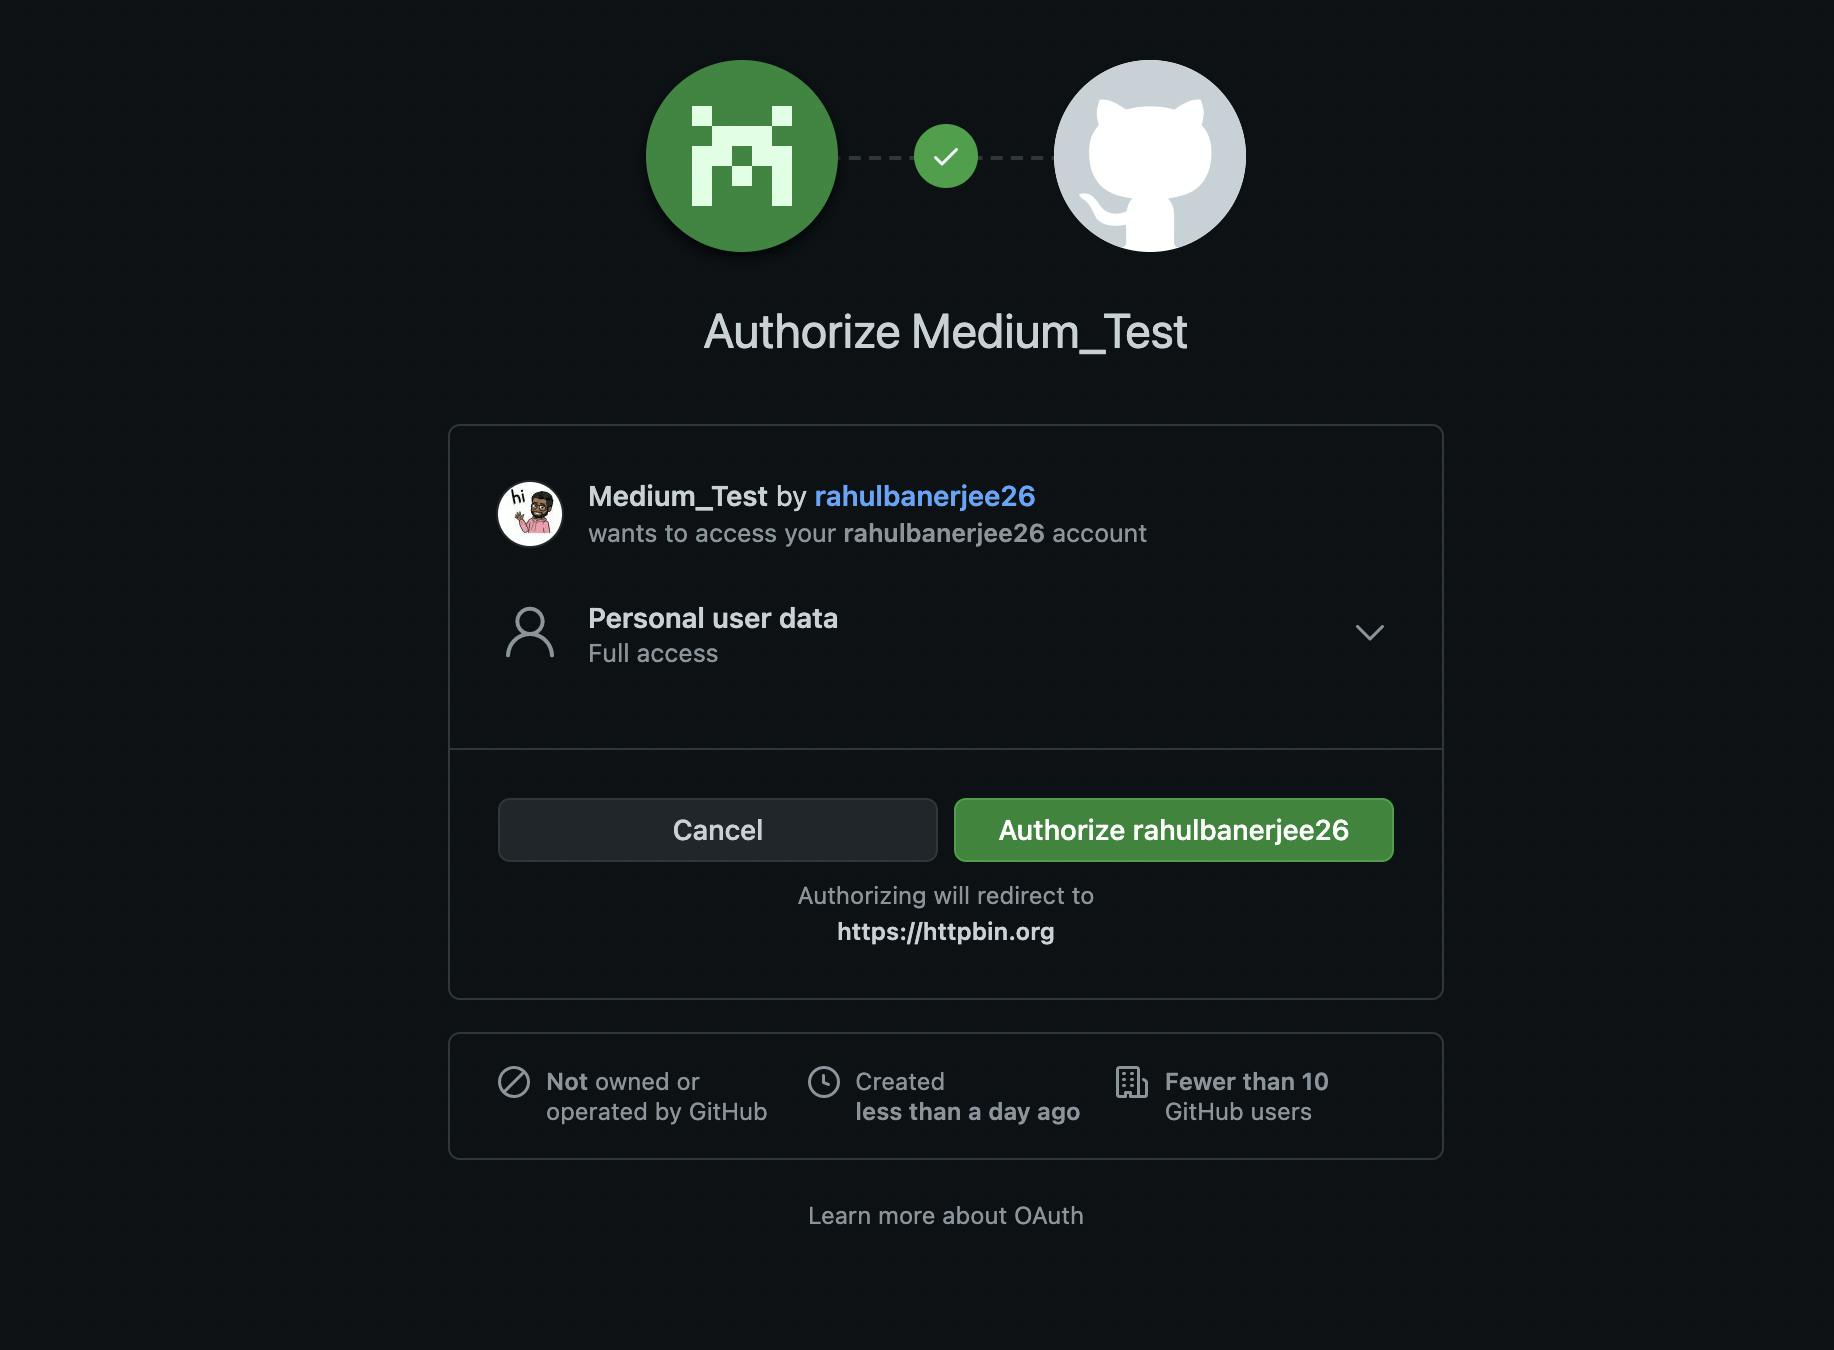
https://httpbin.org/anythingFirst, you will have to create a GitHub App. When asked for the web app URL or the redirect URL, use the above-discussed URL. Once you have created the app, store the Client ID and Client Secret in the .env file.
We will write our code using async/await to make it more readable.
  const client_id = process.env.GITHUB_API_CLIENT_ID;
  const client_secret = process.env.GITHUB_API_CLIENT_SECRET;
  const redirect_uri = "https://httpbin.org/anything";
  let params = {
    client_id: client_id,
    redirect_uri: redirect_uri,
    scope: "user",
  };
  let endpoint = "https://github.com/login/oauth/authorize?";
  endpoint = endpoint + new URLSearchParams(params);
  const open = require("open");
  open(endpoint);
The first few lines are simply reading the credentials from our .env file. The params object contains the client ID, the redirect URL which is the HTTPBin URL we discussed earlier and the scope. The value of the scope determines the endpoints you can access and the HTTP Verb Actions you can do.
To add the parameters to our URL, we can use URLSearchParams. To open the url, we will use the open() function. It can be installed using npm
npm install openOnce you click authorize, you should be redirected to the HTTPBin URL and a JSON Object should be displayed. Look at the value for the key "code". This value will be exchanged for an API Token.
We can use the 'readline-sync' to take an input.
npm install readline-syncWe will wait for the user to input their access code
  const readlineSync = require("readline-sync");
  const access_code = readlineSync.question("Please enter the access code ");
  console.log("CODE IS ", access_code);
Once, we get the code, we make another request to an endpoint to get an access token. This time we pass the code along with the client secret as parameters. After GitHub validates the credentials along with the code, it will return an access token. This access token can be used as an API Key.
  params["client_secret"] = client_secret;
  params["code"] = access_code;
  const access_token_url = "https://github.com/login/oauth/access_token?";
  let response = await fetch(access_token_url + new URLSearchParams(params), {
    headers: { Accept: "application/json", method: "POST" },
  });
  let data = await response.json();
  const access_token = data["access_token"];
  console.log(access_token);
This access token can be used to authenticate ourselves and make requests to the API Endpoints.
  const headers = {
    Authorization: token ${access_token},
  };
  const base_api_endpoint = "api.github.com/user";
  response = await fetch(base_api_endpoint + "/repos", {
    headers: headers,
  });
  data = await response.json();
  console.log(data);
Using the Genius API (OAuth2)
Let's take a look at another example. I'll skip the part where we import the packages and read the credentials.
 let params = {
    client_id: genius_client_id,
    redirect_uri: redirect_uri,
    response_type: "code",
    scope: "me",
  };
  let endpoint = "https://api.genius.com/oauth/authorize?";
  endpoint = endpoint + new URLSearchParams(params);
  const open = require("open");
  open(endpoint);
The "response_type" is mandatory for some APIs, the value should always be "code"
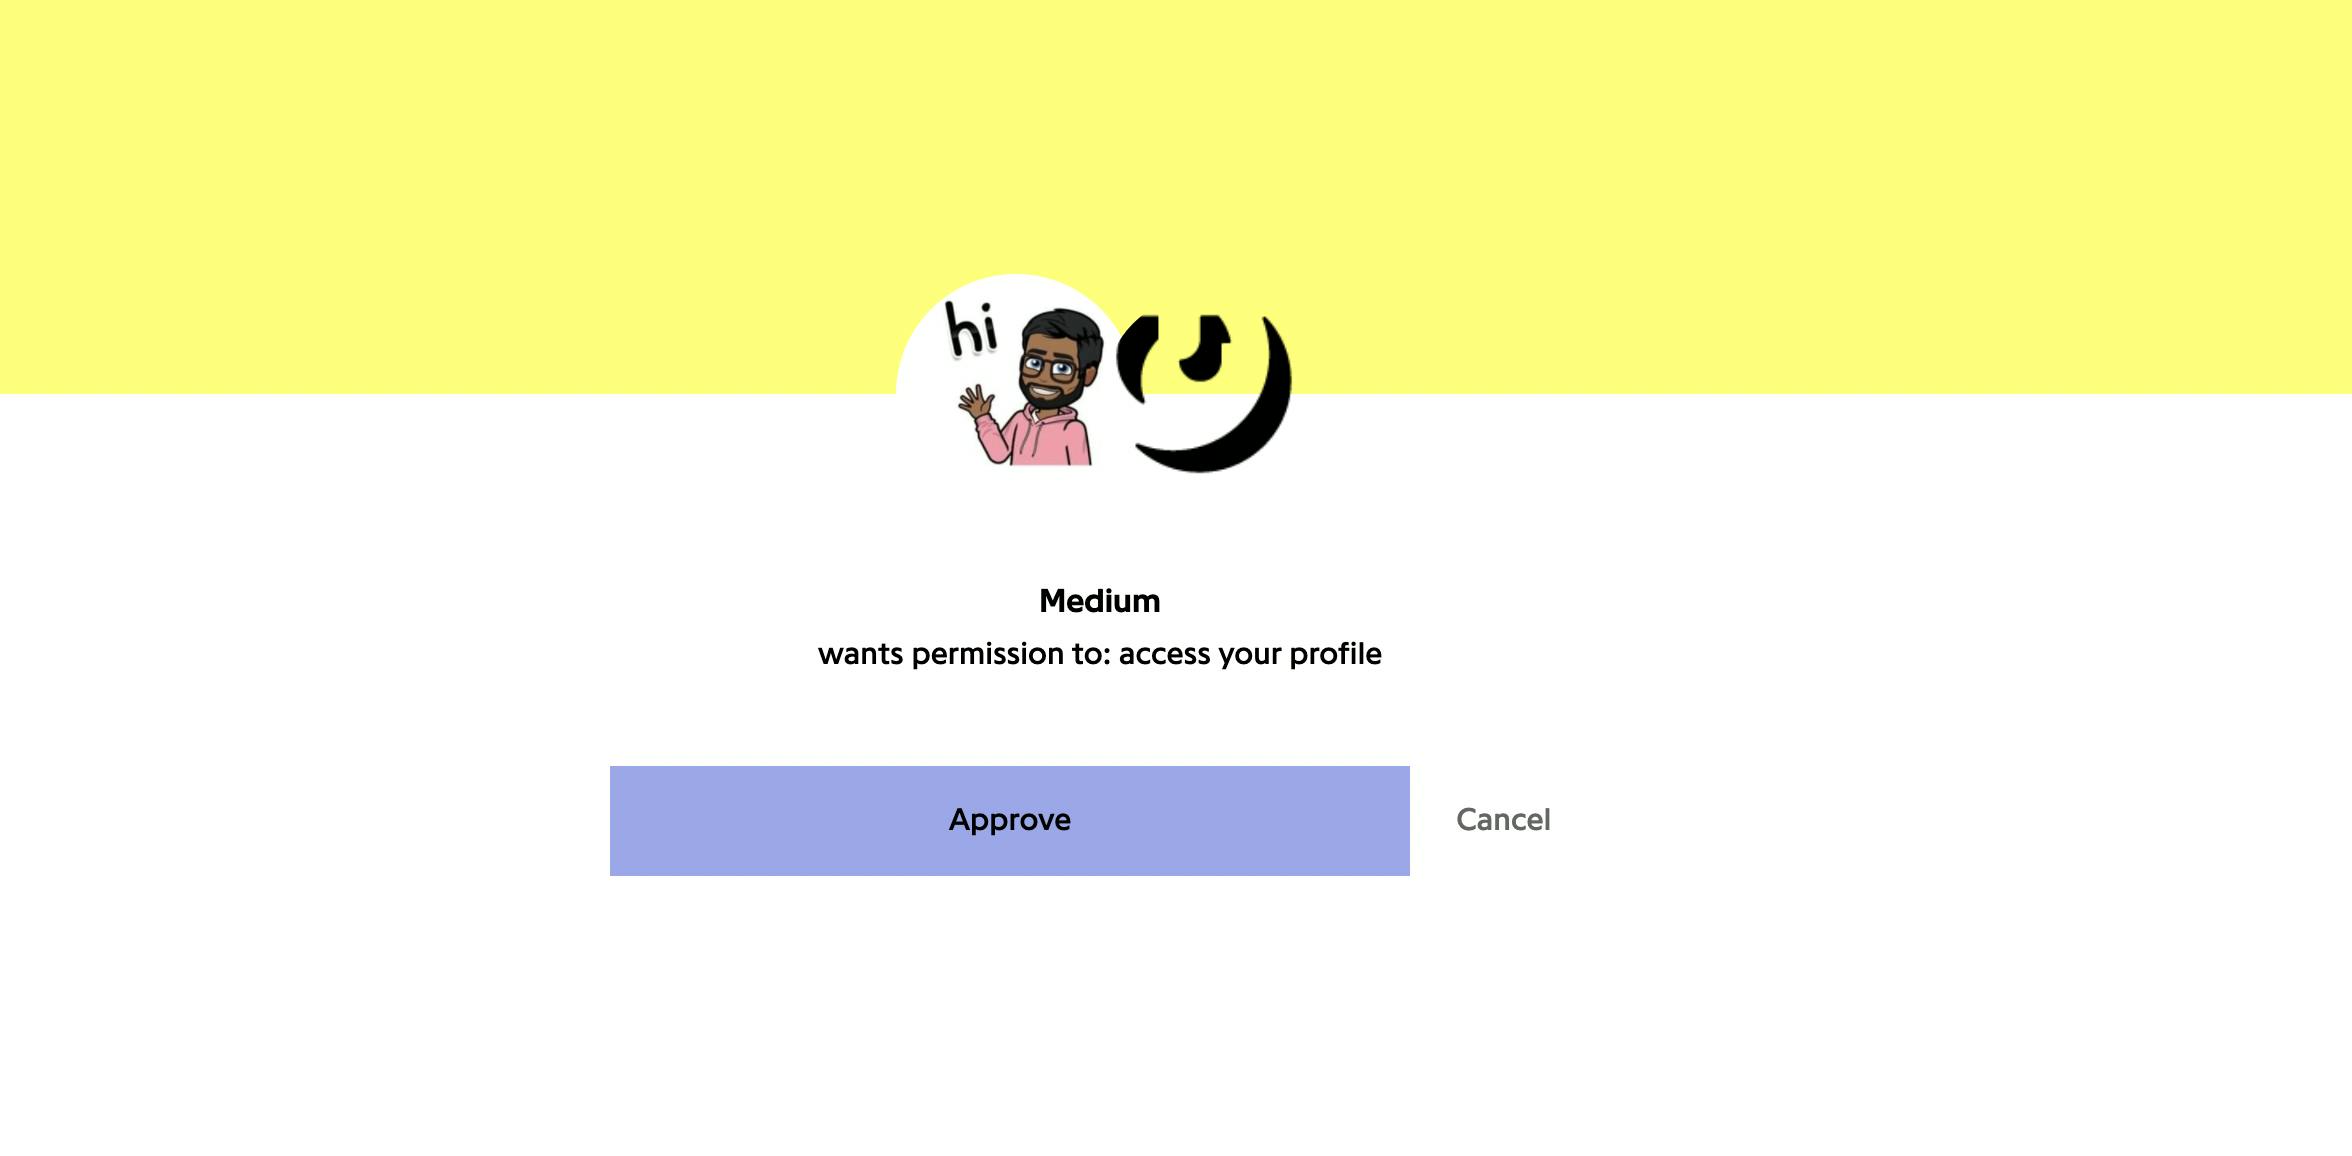
After we authorize, we will see a JSON object similar to the one we saw when working with the GitHub API. Input the Code.
  const readlineSync = require("readline-sync");
  const access_code = readlineSync.question("Please enter the access code ");
  console.log("CODE IS ", access_code);
  params["client_secret"] = genius_client_secret;
  params["code"] = access_code;
  params["grant_type"] = "authorization_code";
  const access_token_url = "https://api.genius.com/oauth/token?";
  let response = await fetch(access_token_url + new URLSearchParams(params), {
    headers: { Accept: "application/json" },
    method: "POST",
  });
  let data = await response.json();
  const access_token = data["access_token"];
  console.log(access_token);
"grant_type" is also required by some APIs. The value is always "authorization_code". After our code is validated, we get an access token. This token can be used as an API Key.
  const headers = {
    authorization: Bearer ${access_token},
  };
  const base_api_endpoint = "api.genius.com/account";
  response = await fetch(base_api_endpoint, {
    headers: headers,
  });
  data = await response.json();
  console.log(data);
The Genius API uses Bearer Authentication.
Conclusion
I hope this article serves as a good guide to work with APIs in JavScript. Before consuming an API directly, always look for a wrapper. The 5 mins you spend looking for a wrapper might save you hours of headache.